5分钟 IDEA 插件开发快速入门 Demo
基于 Gradle 开发 IntelliJ 插件是官方推荐的方式。本 Demo 使用 IntelliJ Platform Plugin Template 快速构建一个插件项目 。 利用 IntelliJ Platform 平台开发自己的第一个插件!
5分钟 IDEA 插件开发快速入门 Demo
基于 Gradle 开发 IntelliJ 插件是官方推荐的方式。本 Demo 使用 IntelliJ Platform Plugin Template 快速构建一个插件项目 。 利用 IntelliJ Platform 平台开发自己的第一个插件!
Demo简介
本Demo主要演示如何快速构建一个插件项目,实现一个 Action,对 IDEA 插件开发有个最基本的了解。
本Demo目标:
- 快速搭建一个插件项目
- 完成一个Menu Action:选中Java代码并替换成固定字符串
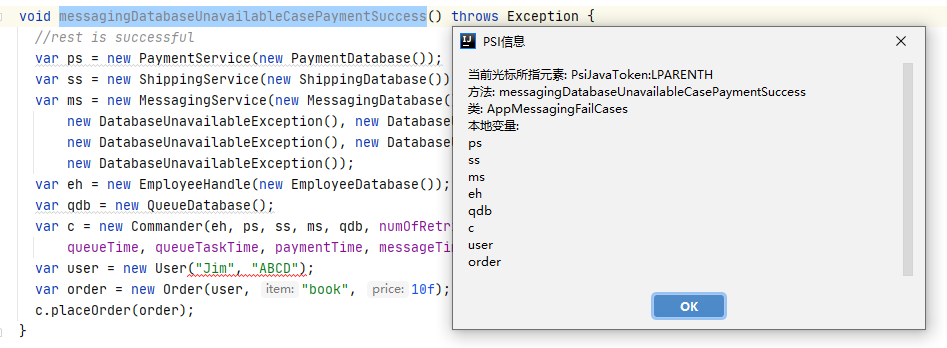
- 了解PSI概念: 编写一个 Action,弹出窗口,显示光标所在位置上的 Java 方法相关的 PSI 信息
项目结构预览
  1~5-Minutes-Demo~\QUICK-PLUGIN-DEMO
  2|   .gitignore
  3|   build.gradle.kts
  4|   CHANGELOG.md
  5|   CODE_OF_CONDUCT.md
  6|   gradle.properties
  7|   gradlew
  8|   gradlew.bat
  9|   LICENSE
 10|   qodana.yml
 11|   README.md
 12|   settings.gradle.kts
 13|
 14+---.github
 15|   |   dependabot.yml
 16|   |
 17|   +---ISSUE_TEMPLATE
 18|   |       bug_report.md
 19|   |
 20|   +---readme
 21|   |       draft-release.png
 22|   |       intellij-platform-plugin-template.png
 23|   |       qodana.png
 24|   |       run-debug-configurations.png
 25|   |       run-logs.png
 26|   |       settings-secrets.png
 27|   |       ui-testing.png
 28|   |       use-this-template.png
 29|   |
 30|   +---template-cleanup
 31|   |   |   CHANGELOG.md
 32|   |   |   gradle.properties
 33|   |   |   README.md
 34|   |   |   settings.gradle.kts
 35|   |   |
 36|   |   \---.github
 37|   |           dependabot.yml
 38|   |
 39|   \---workflows
 40|           build.yml
 41|           release.yml
 42|           run-ui-tests.yml
 43|           template-cleanup.yml
 44|
 45+---.idea
 46|       icon.png
 47|
 48+---.run
 49|       Run IDE for UI Tests.run.xml
 50|       Run IDE with Plugin.run.xml
 51|       Run Plugin Tests.run.xml
 52|       Run Plugin Verification.run.xml
 53|       Run Qodana.run.xml
 54|
 55+---gradle
 56|   \---wrapper
 57|           gradle-wrapper.jar
 58|           gradle-wrapper.properties
 59|
 60\---src
 61    +---main
 62    |   +---java
 63    |   |   \---jiux
 64    |   |       \---net
 65    |   |           \---idea
 66    |   |               \---plugin
 67    |   |                   \---demo
 68    |   |                       \---action
 69    |   |                               EditorReplaceAction.java
 70    |   |                               PsiDemoAction.java
 71    |   |
 72    |   +---kotlin
 73    |   |   \---org
 74    |   |       \---jetbrains
 75    |   |           \---plugins
 76    |   |               \---template
 77    |   |                   |   MyBundle.kt
 78    |   |                   |
 79    |   |                   +---listeners
 80    |   |                   |       MyProjectManagerListener.kt
 81    |   |                   |
 82    |   |                   \---services
 83    |   |                           MyApplicationService.kt
 84    |   |                           MyProjectService.kt
 85    |   |
 86    |   \---resources
 87    |       +---messages
 88    |       |       MyBundle.properties
 89    |       |
 90    |       \---META-INF
 91    |               plugin.xml
 92    |               pluginIcon.svg
 93    |
 94    \---test
 95        +---kotlin
 96        |   \---org
 97        |       \---jetbrains
 98        |           \---plugins
 99        |               \---template
100        |                       MyPluginTest.kt
101        |
102        \---testData
103            \---rename
104                    foo.xml
105                    foo_after.xml
第一步:利用 IntelliJ Platform Plugin Template 创建项目
1# clone 项目到本地
2
3git clone git@github.com:JetBrains/intellij-platform-plugin-template.git quick-plugin-demo
4
5# 删除 github 的远程仓库地址, 切换成自己的
6
7git remote rm origin
8
9git remote add origin 自己的远程仓库地址
该步骤有可能因为墙的原因网络被中断,多试几次。
第二步:导入项目,进行相关配置
修改配置支持Java8
- gradle.properties
 1
 2# 插件支持的最小版本改为 202
 3pluginSinceBuild=202
 4#增加 2020.2版本
 5pluginVerifierIdeVersions=2020.2, 2020.3.4, 2021.1.3, 2021.2.1
 6# IC是社区版,这里用IU企业版
 7platformType=IU
 8#该版本为要求Java8的最高版本,在此之后的版本最低要求Java11
 9platformVersion=2020.2
10#JDK1.8
11javaVersion=1.8
IDEA 更多版本号,参见 最新IDEA版本
- build.gradle.kts
1// 将 Gradle IntelliJ Plugin 的版本修改为 1.0
2id("org.jetbrains.intellij") version "1.0"
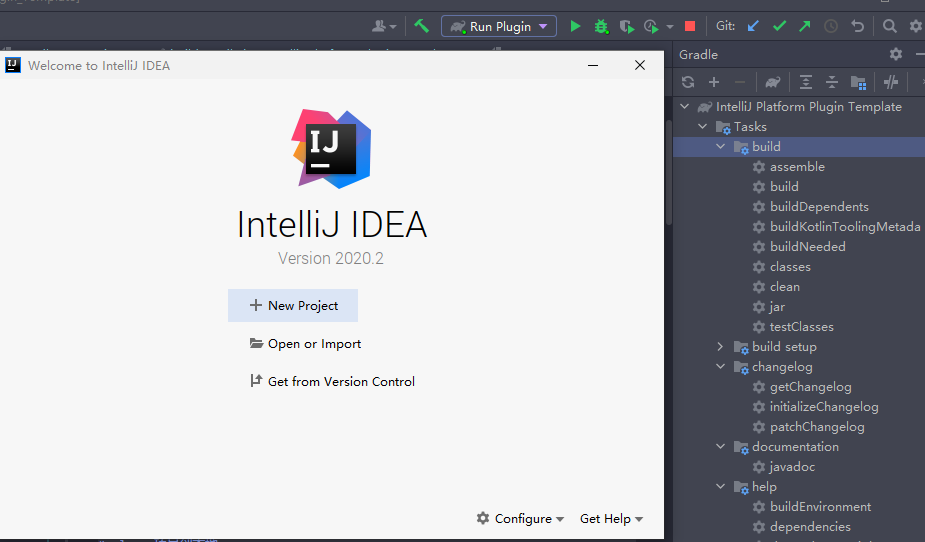
完成以上修改后, 重新加载项目,点击运行 Run Plugin 启动插件。
支持Java平台
默认只引入了基础平台相关的Jar包,要支持 Java 语言,需要自己添加。
- gradle.properties
1
2# 引入Java支持
3platformPlugins=com.intellij.java
- src/main/resources/META-INF/plugin.xml
1
2<idea-plugin>
3
4    <!-- 引入Java依赖 -->
5    <depends>com.intellij.java</depends>
6    <depends>com.intellij.modules.lang</depends>
7
8</idea-plugin>
- 创建Java源代码目录
IDEA 插件既支持 Kotlin,Java 语言独立开发,也支持两者混合开发,写的类可以互相调用。 默认只有 kotlin 源代码目录。 Java 源代码目录需要手动创建。 创建 src/main/java 即可开始写 Java 代码了。
默认的 kotlin 目录可以删除,但个人建议保留。 因为 kotlin 下的代码可以直接拿来做国际化,有些开源库是 kotlin 写的,可以直接 拿来用,混合开发还是比较有优势的。
完成以上步骤后,刷新下项目,相关的依赖就加入到工程中了, 可以正式开始写代码了。
第三步 创建一个 Action
Action 是一个具有状态,展示和行为的实体。 通过继承 AnAction 重写 actionPerformed 方法实现 Action 的行为控制。 通过可选择地重写 update 方法实现 Action 的展示控制。
- com.dmall.rdp.plugin.demo.action.EditorReplaceAction
 1/**
 2 * Menu Action 将代码中选中的字符替换成固定的字符
 3 */
 4public class EditorReplaceAction extends AnAction {
 5    /**
 6     * Action 事件处理
 7     *
 8     * @param e 事件对象
 9     */
10    @Override
11    public void actionPerformed(@NotNull AnActionEvent e) {
12        // 获取当前工程,当前编辑器,当前文档
13        final Editor editor = e.getRequiredData(CommonDataKeys.EDITOR);
14        final Project project = e.getRequiredData(CommonDataKeys.PROJECT);
15        final Document document = editor.getDocument();
16
17        // 获取编辑器当前光标
18        Caret primaryCaret = editor.getCaretModel().getPrimaryCaret();
19        // 光标选中的开始位置和结束位置
20        int start = primaryCaret.getSelectionStart();
21        int end = primaryCaret.getSelectionEnd();
22        // 将选中的字符替换成固定字符
23        // 注意不能直接使用  document.replaceString() 方法
24        // document.replace相关操作文档的方法,不能在直接在事件处理上下文线程中执行。
25        // 而是 必须 在 写操作的上下文线程中执行,即使用 WriteCommandAction.runWriteCommandAction 方法
26        // 因为 这类文档操作 被认为是耗时的操作,不能阻塞UI事件主线程。
27        WriteCommandAction.runWriteCommandAction(project, () ->
28                document.replaceString(start, end, "~这是替换的~")
29        );
30        // 刚才替换的字符串取消选中
31        primaryCaret.removeSelection();
32    }
33
34    /**
35     * 控制在菜单中的展示,满足以下条件时可见且可用:
36     * <ul>
37     *   <li>工程打开</li>
38     *   <li>编辑器打开</li>
39     *   <li>字符串被选中</li>
40     * </ul>
41     *
42     * @param e Event related to this action
43     */
44    @Override
45    public void update(@NotNull AnActionEvent e) {
46        // 获取当前工程
47        final Project project = e.getProject();
48        // 获取编辑器
49        final Editor editor = e.getData(CommonDataKeys.EDITOR);
50        // 仅在 当前工程和编辑器不为空时(它们都处于打开的状态),且存在选中的字符时,设置该 Menu Action 可见且可用
51        e.getPresentation().setEnabledAndVisible(
52                project != null && editor != null && editor.getSelectionModel().hasSelection());
53    }
54}
- src/main/resources/META-INF/plugin.xml
 1
 2<actions>
 3    <!-- 将此 Action 放到弹出菜单的第一个位置; 如果项目和编辑器是打开的,有字符被选中时,它总是可用的 -->
 4    <action id="com.dmall.rdp.plugin.demo.action.EditorReplaceAction"
 5            class="com.dmall.rdp.plugin.demo.action.EditorReplaceAction"
 6            text="选中替换"
 7            description="选中替换">
 8        <!-- 设置快捷键 Ctrl+Alt+G -->
 9        <keyboard-shortcut keymap="$default" first-keystroke="control alt G"/>
10        <!-- 放到编辑器弹出菜单第一个位置 -->
11        <add-to-group group-id="EditorPopupMenu" anchor="first"/>
12    </action>
13</actions>
第四步 创建一个 Action 展示 PSI 信息
PSI 简介
程序结构接口(Program Structure Interface),通常简称为PSI。 是IntelliJ平台中负责解析文件和创建语法和语义代码模型的层。
- PSI 文件
PSI 文件是一个程序逻辑结构的根,该结构将文件的内容表示为一种特定编程语言中的元素的层次结构。 PsiFile 类是所有 PSI 文件的通用基类,而特定语言的文件通常由其子类表示。 例如,PsiJavaFile 类表示一个Java文件,而 XmlFile 类表示一个XML文件
- PSI 元素
一个 PSI 文件代表了 PSI 元素(也叫 PSI 树)的层次结构。 PSI 元素表示源代码的内部结构,是由 IntelliJ 平台解析的。 在 PSI 元素上的操作一般用于代码分析,代码检查等。
PsiElement 类是 PSI 元素的通用基类。
有关 PSI 的更多介绍,参见 PSI
展示 PSI 信息
- com.dmall.rdp.plugin.demo.action.PsiDemoAction
 1/**
 2 * PSI 演示 Action,展示光标所处位置上的 PSI 元素信息。
 3 *
 4 */
 5public class PsiDemoAction extends AnAction {
 6    @Override
 7    public void actionPerformed(AnActionEvent anActionEvent) {
 8        //获取当前编辑器和 PSIFile 对象
 9        Editor editor = anActionEvent.getData(CommonDataKeys.EDITOR);
10        PsiFile psiFile = anActionEvent.getData(CommonDataKeys.PSI_FILE);
11        if (editor == null || psiFile == null) {
12            return;
13        }
14        //获取光标在文档中的偏移量
15        int offset = editor.getCaretModel().getOffset();
16        final StringBuilder infoBuilder = new StringBuilder();
17        //获取光标所在位置的 PSI 树中的元素
18        PsiElement element = psiFile.findElementAt(offset);
19        infoBuilder.append("当前光标所指元素: ").append(element).append("\n");
20        if (element != null) {
21            //查找 方法
22            PsiMethod containingMethod = PsiTreeUtil.getParentOfType(element, PsiMethod.class);
23            infoBuilder
24                    .append("方法: ")
25                    .append(containingMethod != null ? containingMethod.getName() : "none")
26                    .append("\n");
27            if (containingMethod != null) {
28                //查找方法所属的类
29                PsiClass containingClass = containingMethod.getContainingClass();
30                infoBuilder
31                        .append("类: ")
32                        .append(containingClass != null ? containingClass.getName() : "none")
33                        .append("\n");
34                //查找方法中的本地变量
35                infoBuilder.append("本地变量:\n");
36                containingMethod.accept(new JavaRecursiveElementVisitor() {
37                    @Override
38                    public void visitLocalVariable(PsiLocalVariable variable) {
39                        super.visitLocalVariable(variable);
40                        infoBuilder.append(variable.getName()).append("\n");
41                    }
42                });
43            }
44        }
45        Messages.showMessageDialog(anActionEvent.getProject(), infoBuilder.toString(), "PSI信息", null);
46    }
47
48    @Override
49    public void update(AnActionEvent e) {
50        Editor editor = e.getData(CommonDataKeys.EDITOR);
51        PsiFile psiFile = e.getData(CommonDataKeys.PSI_FILE);
52        e.getPresentation().setEnabled(editor != null && psiFile != null);
53    }
54}
- src/main/resources/META-INF/plugin.xml
1
2    <!-- 将此 Action 放在工具菜单的最后一个位置; 如果项目和编辑器是打开的,它总是可用的 -->
3    <action
4            id="com.dmall.rdp.plugin.demo.action.PsiDemoAction"
5            class="com.dmall.rdp.plugin.demo.action.PsiDemoAction"
6            text="查看PSI信息 ">
7        <!-- 放到工具菜单第后一个位置 -->
8        <add-to-group group-id="ToolsMenu" anchor="last"/>
9    </action>
第五步运行插件,查看效果
点击 Run Plugin 或 Debug Plugin 运行插件,试着操作,查看效果。


一些特别有用的参考
下面收集的文档对开发插件是非常有帮助的,建议深入熟悉。
- 开发及API文档参考 Intellij 平台官方文档
- 入门参考 Intellij SDK代码示例
- 插件高级应用参考 Intellij IDEA 社区版源码
- 插件高级应用参考 IntelliJ IDEA Ultimate和其它基于IntelliJ平台的IDE发行版中包含的开源插件源码
- 代码质量检查类插件参考 阿里代码规范检查插件源码
- 插件开发必备 PSIViewer 查看PSI结构的插件
- 代码辅助生成类插件参考 Lombok插件源码
- 搜索扩展 Intellij IDEA 平台功能扩展点的开源实现代码,相当有用,能给你灵感 Intellij Platform Explorer
